This guide is using the old version of DivX codec, v4.12. I think this is a bug-free and stable version and i'll suggest it if you are a newbie. Anyway if you like to use the new version read the guide here.
Please follow the instructions exactly as shown here. A small change at the settings can have a big effect at your video. Always use the programs you can download from here, as different versions may not work right.
![]()
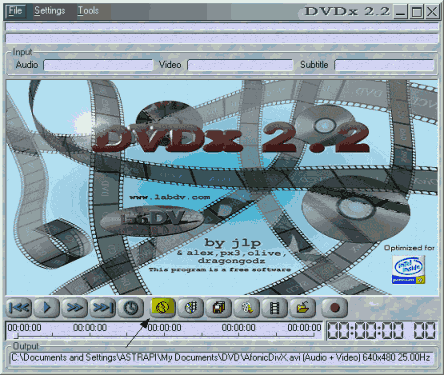 |
This is DVDx 2.2, a very nice and free program. First click at the highlighted icon to select the source of the video wo want to encode. |
![]()
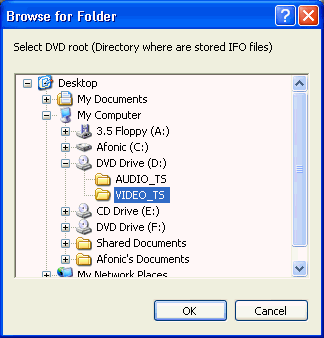 |
Now we select the VIDEO_TS folder of the DVD we want to rip. Sometimes DVDx does this automatically for us so we proceed to next step. |
![]()
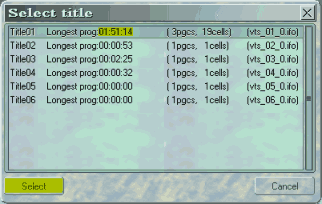 |
Here you have to select the Title which has the BIGGEST length. In our situation it is Title01. Highlight it and then click select. Don't worry about the other ones, they are just intros or ads of the movie. |
![]()
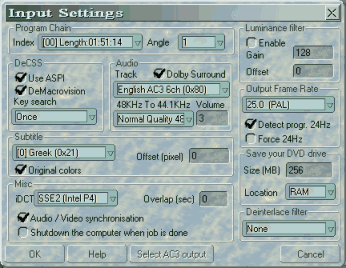 |
After we select the right Title this window comes up. Make sure Angle is set to 1. Check Use ASPI and DeMacrovision. At Key Search once must be OK, if you encounter problems you can try Each VOB ID or Each VOB/CELL ID. At subtitle select none for no subtitle or select the language your want. At Audio select Doldy Surround and select the track you want. At Output Frame Rate select the right values for PAL and NTSC. Also check Forse 24Hz if your DVD is NTSC. At Misc select the Audio / Video synchronisation and select Shutdown the computer when job is done if you want the computer to automatically shutdown after the encoding. In iDCT use SSE2 if you have a P4, otherwise use FPU. At Save your DVD drive select a big value at the Size, as the ripping takes long and that's not good for your DVD. If you have 512MB of RAM select 256MB at the RAM. If You have 256, 128MB at the RAM. If you have even less select 256MB at the Hard disk. At Deinterlace filter leave None and then click OK. |
![]()
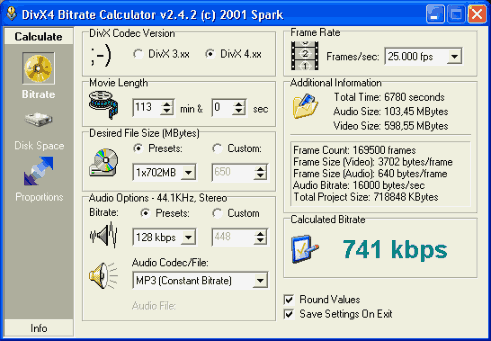 |
Now it's time to select the right bitrate for our movie.Open the DivX bitrate calculator. Calculate the minutes of the movie by the length DVDx shows, ignoring the seconds and add 2. For example here I did: 60 + 51 + 2 = 113. Select DivX 4.xx and the desired size. At the audio options make the same selections as I have here. Also round values. Here I will use 740 kbps. Make sure the bitrate isn't less than 700 kbps especially for action movies. If it is use 2 CDs. Also use 700MB CDs because the 50MB more help to increase quality. Remember the value (here it is 740) and close the program. |
![]()
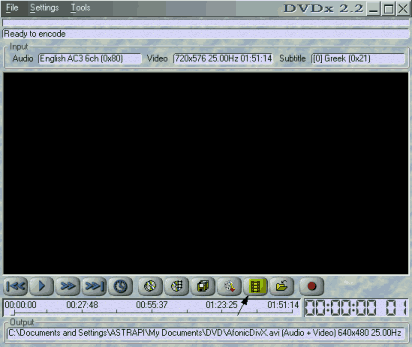 |
Back to DVDx now. Click at the icon that is highlighted. |
![]()
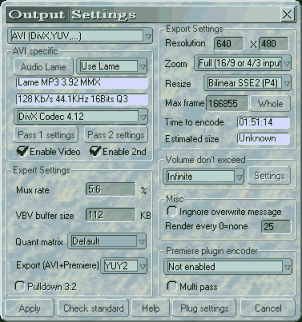 |
In this one just fill in all the values as you see them here. Make sure you select the DivX codex and that you enable 2nd Pass, as well as Use Lame. At Zoom select None or Full. At resize select Bilinear SEE2 for P4 or BiCubic SSE/3DNow. Be sure to click at Whole button. At Volume don't exceed select Infinite as DVDx can't create two files if 2-pass is enabled. For two CDs movie read this guide to chop the AVI file in two after encoding. Now click at Audio Lame. |
![]()
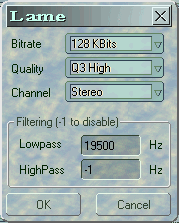 |
Here select the values shown here. Click OK and you will back at the window in Step 7. Now click Pass 1 settings. |
![]()
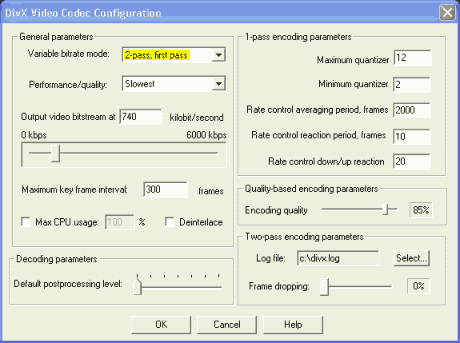 |
Here make sure that 2-pass, first pass is selected in Variable bitrate mode. Select Slowest right below and at Output video bitstream write the value we calculated in Step 5. The other select as shown. Click OK and then click on Pass 2 settings button. |
![]()
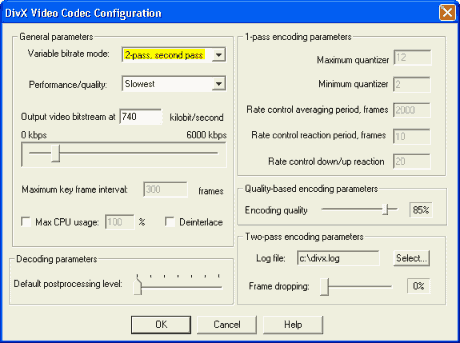 |
Here be sure that you choose 2-pass, second pass in Variable bitrate mode. Select the same bitrate as before and click OK, and then Apply at the window of Step 7. |
![]()
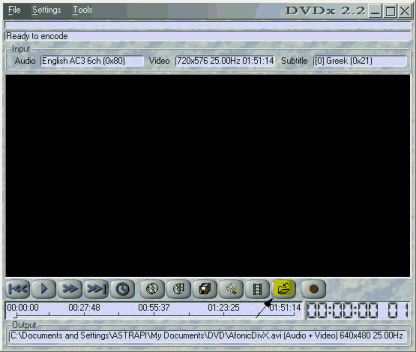 |
Now select the highlighted button to select the target file. |
![]()
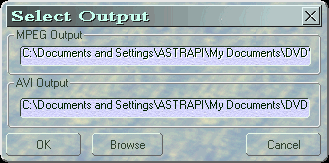 |
Here click Browse and select the folder and the filename of your file and then OK. |
![]()
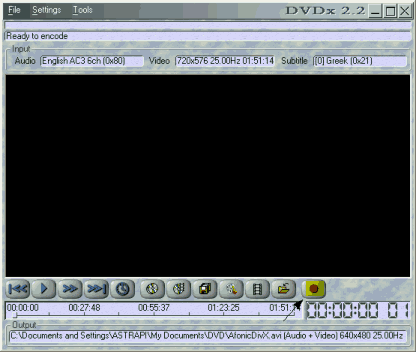 |
Now click the rec button. Wait for 10 minutes and watch the progress. If you see horizontal lines in the video stop the encoding and go back to Step 4 and then select Interpolate at the Deinterlace filter option. After the encoding finishes you can burn the avi file in a CD using the common ISO/Data option. Using the player we have here is a good idea. |
NOTE: At the middle of the process (at 50%) a window will come up saying "Releasing the AVI file, please wait and do not kill the application". Please do so! It can take from 10 to 40 minutes to continue so please wait. it may seem that it's not working but it does!

